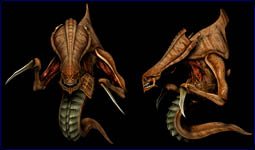
TIPS TO ZERG
 Zerg: A face only a hive-queen could love.
One approach to Starcraft is trying to get the most out of every
individual unit. If you're playing Zerg, send your Overlord out
as a scout at the start. Yes, it's painfully slow, but often gives
us useful tidbits like where the enemy base is.
While your reluctant scout is trudging its way across the map,
start building your base. The first three structures generally
built by Zerg players are a Spawning Pool, a Hydralisk Den,
and a second Hatchery. Constantly be building Drones, and if you
can be rushed, make some Zerglings. Once the above buildings are done,
start mass producing Hydralisks. As we will see later,
Hydras are the backbone of the Zerg force for most of the game.
On a defensive note, develop burrowing as soon as possible;
if your Drones are attacked by enemy troops, simply burrow them until
the danger subsides.

If you want to rush, try this irritating little trick.
When the game begins, don't build a fifth drone. Wait until the
four you have collect enough funds, then build a Spawning Pool.
While the Pool is building, increase your drone force and build an
additional Overlord. Once the Spawning Pool is complete, select your
larvae and morph them into Zerglings. Immediately send them to the enemy
base and attack their peons. On a small map, you can be there before a
Terran or Protoss player has a single warrior.
If you use the above tactic against a Protoss player but don't quite
finish him off, build a Spire and get Mutalisks as soon as possible.
Build a bunch of these and send them over; the Protoss player won't
have much air defense. Simply kill off his units from above.
Going for Mutalisks early also works great on island maps; don't build
any Zerglings, go straight to air units and attack away.
 Rushing tricks will give you a few wins, but the player that can do
nothing else may be the first to actually get a negative score on Battle.net.
For longer games, the Hydralisk is a crucial unit. It is extremely
flexible, capable of air and ground attacks, fast, cheap, and quite
powerful in groups. Build huge swarms of these while moving up the
technology ladder; they are not only effective middle game troops but
also work well in support of advanced units. If you're going against
Protoss Zealots, use hit and run tactics to do damage without retribution
. Beware of area-effect weapons like Irradiate, though; they can turn
your attack force into grease for Siege Tank treads.
Clearly, Overlords are critical to the Zerg effort; I have yet to win
a game without building one. However, many players do not use them to
their full potential. Not only do they allow you to build units, but
they are potentially detectors and transports all that for the low
price of 100 credits. Use this: drop off units in unexpected places.
Later in the game you will have enough Overlords to move a huge force.
Just make sure you don't get ambushed, as they are not as expendable as a
normal transport.
Another important air unit is the Queen. Use her parasite ability on
an enemy peon to get a good view of the interior of their base.
Ensnare is good for slowing tightly-packed groups of troops.
Also, if you're being harassed by cloaked units, cast Ensnare on top
of their suspected location; they will decloak. Broodlings aren't
quite as dangerous as the Queen's other specials, as they only kill
one ground unit. If you use them, target something expensive, like a
Siege Tank or Ultralisk.
The Zerg counter to Terran Battlecruisers and Protoss Carriers are
bat-like Scourge. If the enemy is building fleets of large spacecraft,
Scourge are your best hope of defense. The use of them is fairly straight
forward: simply fly them into an enemy ship to kill it.
As they are weak and easily destroyed, use other units to draw the enemy
fire while they go in. Also, be sure you make enough Scourge to kill
the enemy; if a ship survives and gets repaired, you will have wasted a
lot of resources.
The final and probably most dangerous Zerg airborne unit is the Guardian.
These are obtained by upgrading Mutalisks, and are well worth the price.
The range of these units is enormous, longer than any ground-based
anti-air weapon in the game. Use them to bomb defensive emplacements
from afar. Try to position them so ground units cannot get close
enough to attack. Be cautious, though; they are extremely vulnerable
to airborne attacks. A great combination is backing them up with Scourge
in case an opponent sends in spacecraft.
Late in the game, many Zerg players will build huge packs of Ultralisks
in an attempt to blitz through the defense of an enemy base.
This technique can be effective, but must be used with caution.
Ultralisks are powerful units, but have no ranged attack.
Not only are they unable to defend themselves against air attacks,
but in a large group only those in front can attack.
Don't build huge numbers of Ultralisks; build up to six or so
and support them with ranged units. The combination of Ultralisks
in a line and Hydralisks behind them is lethal.
The last Zerg unit we'll examine is the Defiler. Dark Swarm is a special
rarely used on Battle.net, but it can be quite useful at times.
What it does is protect units in the area of effect from ranged attacks.
It stops the initial attack completely, but any weapons with splash damage
still do harm; the Siege Tank, for example, will penetrate it.
This special is great on defensive installations like bunkers or Photon
Cannons. Cast Dark Swarm on top of the structure, then rush it with
melee units. The units will not be harmed; they are completely protected.
The Defiler's other special is Plague. While Plague doesn't actually
kill anything, it reduces units in the affected area to a few hit points.
It doesn't affect Protoss shields, going straight for the unit's health.
One great tactic is to sneak a Defiler near the enemy peon flow and hit
them with plague. Afterwards, send in some other units to clean them up.
He who does not protect his peons will soon have no peons to protect.


 Rushing tricks will give you a few wins, but the player that can do